Learn to Make a Stylish Crochet Hand Towel Holder
Table of Contents
- Introduction
- Materials Needed
- Step 1: Creating the Slipknot
- Step 2: Attaching the Hair Tie
- Step 3: Single Crocheting Around the Hair Tie
- Step 4: Counting the Stitches
- Step 5: Finishing the First Round
- Step 6: Transitioning to One Strand
- Step 7: Creating Rows of Half Double Crochets
- Step 8: Adding the Button Closure
- Step 9: Finishing Touches
- Conclusion
How to Crochet a Towel Holder for Your Oven Door
Are you tired of your kitchen towel constantly falling off the oven door? Look no further because in this tutorial, I will show you how to crochet a towel holder for your oven door. It is a simple and easy project that can be completed in no time. With just a few materials and basic crochet skills, you can create a functional and stylish towel holder that will keep your towel in place. Let's get started!
Materials Needed
Before we begin, let's gather all the materials you will need for this project:
- Yarn - Choose a yarn of your preference. For this tutorial, I will be using Premier Home's pink yarn, which is available at Jo-Ann for just 99 cents. However, feel free to use any yarn color or brand of your choice.
- Crochet Hook - You will need a crochet hook, preferably size "I" (eye).
- Button - Select a button that matches your yarn color or contrasts nicely with it.
- Hair Tie - Grab a hair tie, preferably one that is stretchy.
- Scissors - Have a pair of scissors ready for cutting your yarn.
Now that we have all the materials, let's move on to the step-by-step instructions.
Step 1: Creating the Slipknot
To start the project, we need to create a slipknot. Here's how:
- Hold the yarn with your left hand and make a loop.
- Insert your hook through the loop.
- Catch the working end of the yarn with your hook, and pull it through the loop.
- Tighten the slipknot by pulling both ends of the yarn.
Step 2: Attaching the Hair Tie
Next, we will attach the hair tie to our project. Follow these steps:
- Insert the hair tie through the slipknot, making sure it is centered.
- Pull the slipknot tight to secure the yarn and hair tie together.
Step 3: Single Crocheting Around the Hair Tie
Now, we will start single crocheting around the hair tie. Single crochet is a basic stitch in crochet. Here's how to do it:
- Insert your hook into the center of the hair tie.
- Yarn over and pull up a loop.
- Yarn over again and pull through both loops on your hook.
Continue single crocheting around the entire hair tie, making sure to keep the stitches tight. The number of single crochets you make depends on the thickness of your hair tie. In this tutorial, I will be making 25 single crochets.
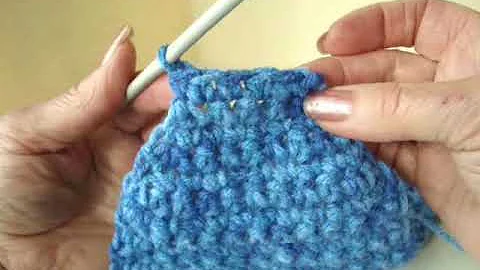
Step 4: Counting the Stitches
To ensure consistency, let's count the stitches we have made on the hair tie. Counting the stitches will help us determine the number of stitches for future rounds. Here's how:
- Starting from the stitch closest to the hook, count each stitch by placing your finger on it.
- Keep counting until you reach the desired number of stitches. In this case, we are aiming for 25 single crochets.
Step 5: Finishing the First Round
Once you have completed your desired number of single crochets, it's time to finish the first round. Follow these steps:
- Locate the first stitch you made and slip stitch into it. A slip stitch is a way to join rounds.
- Insert your hook into the first stitch, yarn over, and pull through to create a slip stitch.
- Cut the yarn, leaving a tail for weaving in later.
- Pull the tail through the loop on your hook to secure it.
Congratulations! You have completed the first round of your towel holder. Take a moment to admire your progress before moving on to the next steps.
Step 6: Transitioning to One Strand
In this step, we will transition from using two strands of yarn to just one strand. Follow these instructions:
- Drop one strand of yarn and keep the other strand.
- Create a chain by yarning over and pulling through the loop on your hook. This will serve as a foundation for the next stitches.
Step 7: Creating Rows of Half Double Crochets
Now, we will create rows of half double crochets to add volume and texture to our towel holder. Here's how to do it:
- Yarn over and insert your hook into the same stitch as the chain.
- Yarn over and pull up a loop.
- Yarn over again and pull through all three loops on your hook.
Repeat this process for the next five stitches, creating a total of six half double crochets. This will be the pattern for each row. Continue working on this pattern for eleven rows, ensuring that you have six stitches in each row.
Step 8: Adding the Button Closure
To secure the towel in place, we will add a button closure. Here's what you need to do:
- Create a chain by yarning over and pulling through the loop on your hook. Make sure the chain is long enough to reach the button.
- Single crochet into the next three stitches.
- Create another chain that is four loops long.
- Single crochet into the next three stitches.
Step 9: Finishing Touches
Now that the crochet work is complete, it's time to finish off your towel holder. Here's what you need to do:
- Cut the yarn, leaving a tail for weaving in later.
- Tighten and secure the last stitch by pulling the tail through the loop on your hook.
- Weave in any loose ends using a tapestry needle to ensure a neat finish.
- Sew the button onto the desired spot on your towel holder, making sure it aligns with the chain loop.
- Trim any excess yarn or loose ends for a clean look.
Conclusion
And there you have it! You have successfully crocheted a functional and stylish towel holder for your oven door. This simple and easy project can be personalized by choosing different yarn colors or buttons to match your kitchen decor. With just a few materials and basic crochet skills, you can create a practical solution to keep your kitchen towel within reach. Now it's time to put your new towel holder to use and enjoy the benefits it brings.
Thank you for following along with this tutorial. I hope you found it helpful and inspiring. Happy crocheting!
Highlights
- Learn how to crochet a towel holder for your oven door
- Simple and easy project that can be completed in no time
- Keep your kitchen towel in place with a functional and stylish holder
- Use basic crochet skills and a few materials to create the holder
- Personalize your holder by choosing different yarn colors and buttons
- Enjoy the benefits of having a towel within reach while cooking
FAQ
Q: Can I use a different yarn weight for this project?
A: Yes, you can use a different yarn weight, but keep in mind that it may affect the size and thickness of the towel holder. Adjust the number of stitches accordingly.
Q: Where can I find hair ties similar to the one used in this tutorial?
A: Hair ties can be found at various stores, such as beauty supply shops, drugstores, or online retailers.
Q: Can I make this towel holder using only one strand of yarn?
A: Yes, you can make the towel holder using only one strand of yarn if you prefer a thinner look. Adjust the number of stitches and rows accordingly.
Q: How do I secure the towel in place with the button closure?
A: Once you have attached the button, simply insert the towel through the chain loop and fasten the button to keep it in place.
Q: Can I make this towel holder as a gift for someone?
A: Absolutely! This towel holder makes a great handmade gift for friends or family members who enjoy cooking or baking. Personalize it with their favorite colors for an extra special touch.
 Beauty


 WHY YOU SHOULD CHOOSE BEAUTYBADY