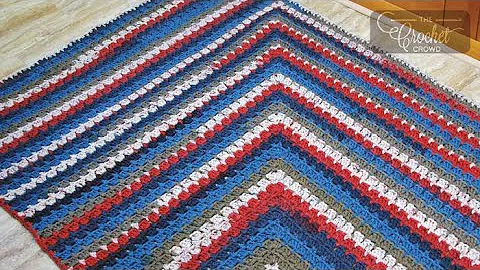
Learn to Crochet the Beautiful Laconia Throw
Table of Contents:
- Introduction
- Materials Needed
- Round 1: Creating the Ring
- Round 2: Adding Chains and Single Crochets
- Changing Colors
- Round 3: Creating Corners
- Round 4: Adding Single Crochets
- Blocking the Squares
- Joining the Squares
- Adding a Border
- Conclusion
Laconia Throw Square Motif Tutorial
Introduction
In this tutorial, we will be making a square motif for the Laconia Throw. This pattern was designed by Nazaden Esfard and is an intermediate-level project. We will be using a 5.0-millimeter hook and a combination of red, yellow, white, and gray yarn.
Materials Needed
- 5.0-millimeter crochet hook
- Red, yellow, white, and gray yarn
- Stitch marker
- Laconia Throw pattern (linked below)
Round 1: Creating the Ring
To start, we will chain six and slip stitch it into the first chain to form a ring. Next, we will chain three and work a treble crochet. The pattern calls for a two treble cluster and a total of eight clusters. Join the round by slip stitching to the first treble.
Round 2: Adding Chains and Single Crochets
In round 2, we will slip stitch into the next two chains, chain five, and single crochet in the next chain three space. Repeat this sequence around and join with a slip stitch at the base of the chain five.
Changing Colors
To change colors, we will join the new color in the next chain five space. We will fasten off the previous color and secure the new color with a chain one.
Round 3: Creating Corners
Round 3 is where we start working on the corners. We will begin by treble crocheting in the next chain space, followed by chaining one and treble crocheting six times. Repeat this sequence for a total of seven treble spaces. In the next chain five space, we will single crochet. Repeat this sequence three times to create four corners.
Round 4: Adding Single Crochets
In round 4, we will chain one, single crochet in the next chain one spot, and repeat this sequence six times. Repeat this pattern three times and join with a slip stitch. Fasten off the color.
Blocking the Squares
If you find that your squares are not completely flat, don't worry. You can block them at the end to make them flatter and more even. Refer to the linked video tutorial for instructions on how to block.
Joining the Squares
Once you have made all the squares, it's time to join them together using the yellow yarn. Follow the linked instructions for joining techniques.
Adding a Border
After joining the squares, you can add a border to complete the Laconia Throw. Feel free to get creative with your border design.
Conclusion
Congratulations! You have successfully created a square motif for the Laconia Throw. We hope you enjoyed following along with this tutorial. If you have any questions or need further assistance, feel free to leave a comment. Don't forget to subscribe to our channel for more crochet tutorials. Happy crocheting!
Highlights:
- Tutorial for creating a square motif for the Laconia Throw
- Intermediate-level project designed by Nazaden Esfard
- Detailed instructions and step-by-step guidance
- Materials needed: crochet hook, yarn, stitch marker
- Techniques covered: chaining, slip stitching, treble crochet, cluster stitch, single crochet
- Tips for blocking the squares and joining them together
- Options for adding a border to the throw
FAQ:
-
Is this pattern suitable for beginners?
- This pattern is considered an intermediate-level project. It assumes knowledge of basic crochet stitches. However, beginners can follow along with the help of tutorial videos.
-
Can I use different colors for the motif?
- Yes, you can use any colors you prefer for the motif. Get creative and make it your own!
-
How many squares do I need to make for the Laconia Throw?
- The number of squares needed will depend on the desired size of the throw. Follow the pattern instructions for the recommended number of squares.
-
Can I use a different yarn weight for this project?
- The pattern suggests using a 5.0-millimeter hook and a specific yarn weight. You can experiment with different yarn weights, but keep in mind that it may affect the size and drape of the finished throw.
 WHY YOU SHOULD CHOOSE BEAUTYBADY


