Learn How to Make an Easy Crochet Towel Ring
Table of Contents:
- Introduction
- Supplies needed
- Creating the towel topper
- Making a slip knot
- Chaining and making a single crochet
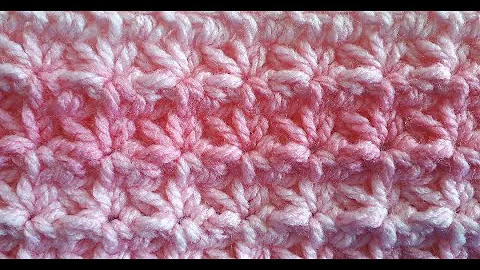
- Working the linen stitch
- Continuing the pattern
- Adding the wooden ring
- Attaching the button
- Creating the tassel
- Making the tassel
- Attaching the bead
- Final touches and adjustments
- Conclusion
How to Make an Adorable Towel Topper and Rings
Are you looking for a modern and stylish towel topper? Look no further! In this tutorial, I will show you how to create your own adorable towel topper and rings. Not only are they super cute, but they are also surprisingly easy to make. So, grab your supplies and let's get started!
Supplies needed
Before we begin, let's gather all the supplies that we'll need for this project. Here's a list of what you'll need:
- Yarn (choose a color of your preference)
- Crochet hook (size according to your yarn weight)
- Wooden rings (approximately 3 inches in diameter)
- Button
- Yarn needle
- Scissors
- Fabric glue (optional)
Now that we have everything we need, let's dive into the step-by-step process of creating your own towel topper and rings.
Step 1: Making a slip knot
To start, we'll make a slip knot. Leave a long tail of about 12 inches or so, as we'll use this later to sew the button down. Make sure the slip knot is secure but not too tight.
Step 2: Chaining and making a single crochet
Next, we'll loosely chain eight stitches. Turn the chain so that the back bump is facing you. Skip one chain and make a single crochet followed by a chain one in the next space. Repeat this pattern of skipping a stitch, making a single crochet, and chaining one until you reach the last stitch. You should have a total of four single crochets.
Step 3: Working the linen stitch
For the second row, chain one and turn. Skip the first single crochet and instead of working in the chain one spaces, we'll work down into the chain that we skipped in the foundation chain. This ensures no gaps and gives a cleaner look. Continue this pattern of chain one, skip a stitch, and make a single crochet down in the foundation chain that was skipped earlier.
Step 4: Continuing the pattern
Chain one and turn. Skip the single crochet and put a single crochet in the chain one space. Repeat this pattern of chaining one, skipping a single crochet, chaining one, and putting a single crochet in the chain one space until you reach the end of the row. Make sure to put a single crochet in the chain one that was made before turning from the previous row.
Continue this pattern until your piece measures about 7 inches. The rule of thumb is approximately 7 inches or about 17 centimeters.
Step 5: Adding the wooden ring
Once your piece measures the desired length, it's time to add the wooden ring. Chain one and turn. Take your wooden ring and place it between your working yarn and the hook. Insert your hook through the ring and pull through a loop, essentially slip stitching. Move the ring out of the way and turn your work so that you can see the stitches. Put your hook through the front loop only, draw up a loop, move the ring back between your working yarn and the hook, and draw through both loops on your hook. This completes an anchor stitch. Continue this process across the row, ensuring that each single crochet goes through the wooden ring.
Step 6: Attaching the button
Using the long tail that we began with, attach the button to the towel topper. Place the button fairly close to the edge, ideally on the same side as what you consider the front side. This will make sure that when you button your towel through the topper, it goes to the backside. Sew the button securely, making sure to hide the tail underneath.
Step 7: Creating the tassel
No towel topper is complete without a tassel! We'll create a simple tassel using our fingers. Wrap your fingers about 9 times with your yarn. Cut another length of yarn, approximately the same length as the previous. Place the extra length of yarn in the center, fold the wrapped yarn in half, and tie the additional length around the top of the tassel. Tie it gently so as not to push the beads up and make it look odd. Shape the tassel to your liking and trim the ends evenly.
Step 8: Final touches and adjustments
Take a few moments to adjust and shape the towel topper and tassel. If desired, iron the tassel to relax the threads. You can also trim the tassel ends further if needed.
Conclusion
Congratulations! You have successfully created an adorable towel topper and rings. This project is a quick and enjoyable way to add a touch of style to your kitchen or bathroom. With your own creative flair and choice of colors, you can customize these towel toppers to match your personal taste and home decor. Enjoy using them or gift them to loved ones. Happy crocheting!
Highlights:
- Learn how to create an adorable towel topper and rings
- Simple and easy-to-follow instructions
- Use a linen stitch pattern for a modern look
- Customize with your choice of colors and wooden rings
- Attach a button for easy buttoning of towels
- Add a tassel for a stylish finishing touch
- Personalize and gift to loved ones
- Quick project with beautiful results
- Great addition to your kitchen or bathroom decor
- Enjoy the satisfaction of creating something unique and handmade
Frequently Asked Questions (FAQs):
Q: Can I use a different size of wooden rings?
A: Yes, you can use wooden rings of different sizes based on your preference. Just make sure they are large enough to fit your towel securely.
Q: Do I need to create buttonholes in the towel topper?
A: No, for this project, the chain one spaces work perfectly as buttonholes. Simply count up about five rows from the wooden ring and find a spot in the center to use as the buttonhole.
Q: Can I use a different type of closure instead of a button?
A: Absolutely! If you prefer a different type of closure, such as a snap or a hook and loop fastener, feel free to use that instead of a button. Adjust the pattern accordingly to accommodate your chosen closure method.
Q: Can I make the tassel shorter or longer?
A: Yes, you can customize the length of the tassel to your preference. Just keep in mind that a shorter tassel may not hang as elegantly but will be less likely to get in the way.
Q: Can I use a different stitch pattern for the towel topper?
A: While the linen stitch pattern gives a beautiful modern look, you can experiment with different stitch patterns if you like. Just make sure to adjust the pattern accordingly to maintain the desired width and length.
Q: How long does it take to complete this project?
A: This project is relatively quick, as it only requires a few rows of crochet. The time required will depend on your crochet speed and the level of detail you put into shaping the tassel and adjusting the towel topper.
Q: Can I wash the towel topper?
A: Yes, you can wash the towel topper. However, it is recommended to hand wash it gently to maintain its shape and prevent any damage to the wooden ring or button.
 Beauty


 WHY YOU SHOULD CHOOSE BEAUTYBADY