Crochet Slippers Tutorial for Beginners
Table of Contents:
- Introduction
- Materials Needed
- Crocheting the Insole
3.1. Taking Measurements
3.2. Starting the Crochet
3.3. Making Chains
3.4. Creating Single Crochet Rows
- Creating the Sparkle Pattern
4.1. Making Long and Short Single Crochet
4.2. Alternating between Long and Short Single Crochet
- Changing Colors
- Crocheting the Other Side
6.1. Counting and Marking Stitch Placement
6.2. Making Chains and Single Crochet Rows
6.3. Creating the Sparkle Pattern on the Other Side
- Sewing the Sides Together
- Finishing Touches
- Conclusion
Crocheting Beautiful Slippers: A Step-by-Step Tutorial
Are you interested in creating your own pair of beautiful crocheted slippers? Look no further! In this tutorial, we will guide you through the process of crocheting these stunning slippers from start to finish. With detailed instructions and helpful tips, even beginners can follow along and create a pair of cozy slippers. So gather your materials and let's get started!
Introduction
Crocheting slippers is a popular and rewarding DIY project. Not only can you customize the design, but you also get to enjoy the comfort and warmth of handmade footwear. In this tutorial, we will be crocheting a pair of beautiful slippers using a step-by-step approach. From creating the insole to sewing the sides together, we will cover all the necessary techniques to make your own cozy pair of slippers.
Materials Needed
Before we begin, let's gather all the materials we will need for this project. Here's a list of what you'll need:
- Crochet hooks (appropriate size for your yarn)
- Yarn (choose a soft and durable yarn in your preferred color)
- Scissors
- Tape measure or ruler
- Stitch markers
- Sewing needle and thread
Make sure you have all these materials ready before starting the tutorial. Now let's move on to crocheting the insole.
Crocheting the Insole
3.1 Taking Measurements
Before we start crocheting, we need to take some measurements to ensure that the slippers will fit perfectly. To do this, place the insole on your foot and use a tape measure or ruler to determine the length and width. This will guide us in creating the correct size for the insole.
3.2 Starting the Crochet
To begin crocheting the insole, we will first create a slip knot and attach it to our crochet hook. Insert the hook into the slip knot and pull it tight. Then, make a single crochet to secure the yarn.
3.3 Making Chains
Next, we will make a series of chains to form the base of the insole. Start by making a chain of 30 stitches, or adjust the number based on your measurements. Once you have the desired number of chains, connect them to the side of the insole using a single crochet stitch.
3.4 Creating Single Crochet Rows
After connecting the chains, we will continue crocheting rows of single crochet stitches. Start by turning your work and skip the first stitch. Insert your crochet hook into the second stitch and make a single crochet. Repeat this process for each stitch until you reach the end of the row. At the end, turn your work and repeat the process for the next row.
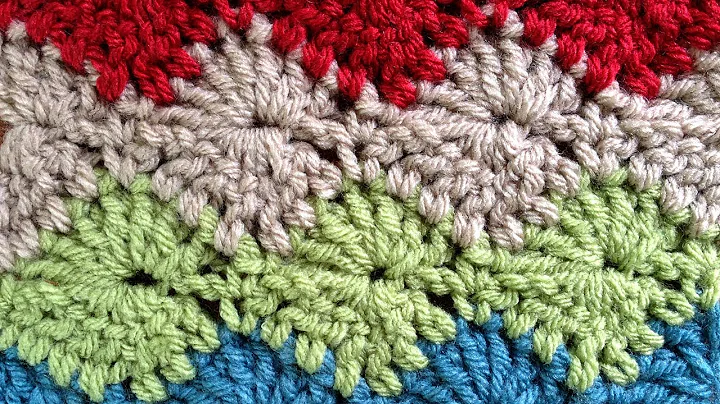
Creating the Sparkle Pattern
Now that we have completed the insole, it's time to add some flair to our slippers with a sparkle pattern. This pattern consists of alternating long and short single crochet stitches to create a textured effect.
4.1 Making Long and Short Single Crochet
To begin the sparkle pattern, we will first learn how to make long and short single crochet stitches. For the long single crochet, insert your crochet hook from behind and pull the yarn through. For the short single crochet, insert your hook in the front loop and pull the yarn through. Practice making these stitches until you feel comfortable with them.
4.2 Alternating between Long and Short Single Crochet
Once you're familiar with the long and short single crochet stitches, it's time to start the sparkle pattern. Alternate between making a short single crochet in the front loop and a long single crochet in the back loop. This will create a textured pattern that adds visual interest to the slippers. Continue alternating between the stitches until you reach the end of the row.
Changing Colors
For a pop of color, you can change the yarn color at this point in the pattern. Simply finish the current row with the current color and then attach the new color by pulling it through the last stitch of the row. Continue crocheting with the new color, leaving the old color to hang down. This will create a seamless transition between colors.
Crocheting the Other Side
Now that we have completed one side of the slipper, we will mirror the process to create the other side. This ensures symmetry in our design.
6.1 Counting and Marking Stitch Placement
To begin crocheting the other side, count the number of stitches between the starting point and the end of the first side. Use stitch markers to mark the placement of the stitches on the other side. This will help ensure that both sides match in size and shape.
6.2 Making Chains and Single Crochet Rows
Following the same process as the first side, start by making chains and connecting them to the designated spots on the second side. Once the chains are connected, crochet rows of single crochet stitches using the same technique as before.
6.3 Creating the Sparkle Pattern on the Other Side
Add the sparkle pattern to the second side by alternating between long and short single crochet stitches. This will create a cohesive look with the first side.
Sewing the Sides Together
With both sides completed, it's time to sew them together to form the slipper. Thread a sewing needle with thread that matches the yarn color and sew along the edges, securing the sides together. Repeat this process for both sides to create the slipper shape. Make sure to secure the stitches well to ensure durability.
Finishing Touches
After sewing the sides together, make any necessary adjustments to ensure a snug fit. Trim any excess yarn or thread and tuck in the ends. Give your slippers a final inspection to make sure your stitches are secure and the overall appearance is neat.
Conclusion
Congratulations! You have successfully crocheted a pair of beautiful slippers. Now it's time to slip them on and enjoy the comfort and warmth of your handmade creation. Crocheting slippers is a great way to exercise your creativity and create customized footwear. We hope you enjoyed this tutorial and found it helpful. Happy crocheting!


 WHY YOU SHOULD CHOOSE BEAUTYBADY